VSCode使用ESLint扫描整个项目的所有文件错误
npx eslint .
npx eslint . --fix
npx eslint . --no-fixnpx eslint .
npx eslint . --fix
npx eslint . --no-fix1.修改 .env.test 配置文件中 VITE_SERVICE_BASE_URL 和VITE_OTHER_SERVICE_BASE_URL, 记得带/api (这个文件是API跳转的基础URL)
2.修改 .env 文件中 VITE_SERVICE_SUCCESS_CODE 这里的成功状态码如果有很多个,可以用 , 分隔。
这个时候request请求需要改造支持多状态码,修改文件src\service\request\index.ts 对应 createFlatRequest 方法下的 isBackendSuccess
isBackendSuccess(response) {
  // 获取成功状态码列表(从环境变量中获取并解析为数组)
  const successCodes = (import.meta.env.VITE_SERVICE_SUCCESS_CODE || "").split(",").map((code) => code.trim());

  // 检查后端返回的 code 是否在成功状态码列表中
  return successCodes.includes(String(response.data.code));
}
3.修改api方法fetchGetUserInfo中api, getUserInfo改getCurrentUser
interface UserInfo {
      /** User ID (from backend: Id) */
      id: number;
      /** Username (from backend: Username) */
      userName: string;
      /** User roles (from backend: Roles) */
      roles: string[];
      /** Button permissions (frontend specific) */
      buttons: string[];
    }
4.路径:src\store\modules\auth\index.ts 下的const userInfo: Api.Auth.UserInfo = reactive 修改, 查询下 UserInfo. 或者 userInfo. 有些字段修改一下
  const userInfo: Api.Auth.UserInfo = reactive({
    id: 0,
    userName: '',
    roles: [],
    buttons: []
  });
wmic os get installdateEssentials版本与Windows 7或更高版本兼容。Full版本至少需要Windows 10
Aspose.Slides for .NET 22.11 新增将演示文稿转换为视频(将 PowerPoint 演示文稿转换为具有动画和过渡效果的视频)
Aspose.Slides 现在可以播放演示文稿,并以特定的每秒帧数 (FPS) 为整个动画生成一组帧。然后可以使用这些帧通过 FFmpeg 等工具创建视频。
此 C# 代码演示了将演示文稿导出为视频的操作,其中帧设置为 30FPS:
const int FPS = 30;

using (Presentation presentation = new Presentation("animated.pptx"))
{
    using (var animationsGenerator = new PresentationAnimationsGenerator(presentation))
    using (var player = new PresentationPlayer(animationsGenerator, FPS))
    {
        player.FrameTick += (sender, args) =>
        {
            args.GetFrame().Save($"frame_{sender.FrameIndex}.png");
        };

        animationsGenerator.Run(presentation.Slides);
    }
}
PresentationAnimationsGenerator类是一个按顺序生成单个动画效果的源,然后使用PresentationPlayer类播放这些效果。每个帧都会生成一个FrameTick事件,以便您可以将当前帧保存到磁盘或将帧写入视频流。
教程:https://blog.aspose.com/slides/convert-ppt-to-video-csharp/
核心问题 由于一个处理的不是骑缝章 ModifyRidingSeamStampWidth和ModifyRidingSeamStampHeight 为0
 // 将骑缝章的cm尺寸转化为px
            (double widthPx, double heightPx) = ImageUtilities.CentimetersToPixels(RidingSeamStampWidth, RidingSeamStampHeight, RidingSeamStampDpiX, RidingSeamStampDpiY);

            // 调整图片大小、透明度
            BitmapSource modifyImage = ImageUtilities.ModifyImage(RidingSeamStampFilePath, widthPx, heightPx, RidingSeamStampTransparency);

            // 将骑缝章的像素尺寸转化为point
            (double widthPt, double heightPt) = ImageUtilities.PixelsToPoints(modifyImage.PixelWidth, modifyImage.PixelHeight, RidingSeamStampDpiX, RidingSeamStampDpiY);

            // 调整骑缝章尺寸
            modifyImage = ImageUtilities.ResizeBitmapSource(modifyImage, widthPt, heightPt);

            // 获取调整后骑缝章图片的宽度和高度
            ModifyRidingSeamStampWidth = widthPt;
            ModifyRidingSeamStampHeight = heightPt;
// 调整图片大小
img.ScaleAbsolute((float)ModifyRidingSeamStampWidth, (float)ModifyRidingSeamStampHeight);样式:2024年08月06日 19:31:48
ffmpeg -i C:\Users\az102\Desktop\input.mp4 -vf "drawtext=fontfile='C\:/Windows/Fonts/simsun.ttc':text='%{pts\:localtime\:1722943908\:%Y年%m月%d日 %H\\\:%M\\\:%S}':x=100:y=100:fontsize=24:fontcolor=white:box=1:boxcolor=0x00000000" -codec:a copy C:\Users\az102\Desktop\output.mp4样式:2024\12\19 08:40:05
ffmpeg -i C:\Users\az102\Desktop\input.mp4 -vf "drawtext=fontfile='C\:/Windows/Fonts/msyh.ttc':text='%{pts\:localtime\:1734568805\:%Y\\\\%m\\\\%d %H\\\:%M\\\:%S}':x=100:y=100:fontsize=19:fontcolor=white:box=1:boxcolor=0x00000000" -codec:a copy C:\Users\az102\Desktop\output.mp4样式:2024/12/19 08:40:05
ffmpeg -i C:\Users\az102\Desktop\input.mp4 -vf "drawtext=fontfile='C\:/Windows/Fonts/msyhbd.ttc':text='%{pts\:localtime\:1734568805\:%Y/%m/%d %H\\\:%M\\\:%S}':x=100:y=100:fontsize=19:fontcolor=white:box=1:boxcolor=0x00000000" -codec:a copy C:\Users\az102\Desktop\output.mp4样式: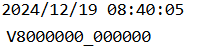
ffmpeg -i C:\Users\az102\Desktop\video\input.mp4 -vf "drawtext=fontfile='C\:/Windows/Fonts/ARIALBD.TTF':text='%{pts\:localtime\:1734568805\:%Y/%m/%d %H\\\:%M\\\:%S}':x=100:y=100:fontsize=20.5:fontcolor=white:box=1:boxcolor=0x00000000, drawtext=fontfile='C\:/Windows/Fonts/ARIALBD.TTF':text='V800000_000000':x=100:y=125:fontsize=20.5:fontcolor=white:box=1:boxcolor=0x00000000" -codec:a copy C:\Users\az102\Desktop\output.mp4在同一页面中使用 System.Windows.Media 和 iTextSharp 绘制文本时出现位置不一致的问题,主要是因为两个库在处理文本的基线和坐标系统方面存在差异。要解决这个问题,我们需要了解这两个库在定位文本时的具体差异,并调整相应的代码以确保文本在视觉上的一致性。
解决方案
要确保在使用 System.Windows.Media 和 iTextSharp 绘制相同大小和样式的文本时,文本的位置相匹配,您可以采取以下步骤:
A. 确定正确的文本位置
测量文本高度:
对于 iTextSharp,使用 BaseFont 的 GetAscentPoint 和 GetDescentPoint 方法来获取文本高度。
对于 System.Windows.Media,使用 FormattedText 类来计算文本的实际高度。
计算文本基线位置:
在 iTextSharp 中,使用 ascent 值来调整文本的 Y 坐标。
在 System.Windows.Media 中,需要计算文本框高度,并相应地调整 Y 坐标,使得文本的基线与 iTextSharp 生成的基线对齐。
1.Media 中的单位为px iTextSharp 单位为point
2.在 System.Windows.Media 中,文本的定位可能依赖于控件或具体的绘图命令,常常是以文本框的左上角为参考。在 iTextSharp 中,文本的定位通常是以文本的基线为参考。这意味着指定的Y坐标是文本基线的位置。
3.Media 坐标原点左上角 iTextSharp 坐标原点左下角
[Parsed_movie_0 @ 000000cdff819fc0] Failed to avformat_open_input 'C'
[AVFilterGraph @ 000000cdff3c0f80] Error initializing filter 'movie' with args 'E:\image.jpg'
Error reinitializing filters!
Failed to inject frame into filter network: No such file or directory
Error while processing the decoded data for stream #0:0
路径的冒号是需要转义的,把路径的转义一下就可以了
像这样:
ffmpeg -i E:\1.mp4 -vf "movie='E\:\\icon.ico'[wm]; [in][wm]overlay=30:30[out]" E:\video\output.mp4watermarkImage = "C:\\image\\water.png"
watermarkImage = watermarkImage.Replace("\\", @"/").Replace(":", @"\:");
// 构造 ffplay 的参数,用于预览水印效果
string ffplayArgs = $"-i \"{selectedVideo}\" -vf \"movie='{watermarkImage}' [watermark]; [in][watermark] overlay=x='if(eq(mod(floor(t),{intervalTime}), 0), clip(sin({randomLeapX}*floor(t)) * (main_w-overlay_w-1)/2 + (main_w-overlay_w)/2, 0, main_w-overlay_w), x)':y='if(eq(mod(floor(t),{intervalTime}), 0), clip(sin({randomLeapY}*floor(t)) * (main_h-overlay_h-1)/2 + (main_h-overlay_h)/2, 0, main_h-overlay_h), y)'\" -x {windowWidth} -y {windowHeight} -window_title 预览";1.创建一个静态类,命名为 GlobalConfig。
2.在 GlobalConfig 类中定义静态只读属性或常量,用于存储你的配置信息(例如 ServerUrl、SoftwareVersion、VersionNumber、ActivationFolderName、ActivationFileName、UpdateUrl)。
public static class GlobalConfig
{
    public static readonly string ServerUrl = "你的服务器URL";
    public static readonly string SoftwareVersion = "软件版本";
    public static readonly int VersionNumber = 1; // 假设版本号是整数
    public static readonly string ActivationFolderName = "激活文件夹名称";
    public static readonly string ActivationFileName = "激活文件名称";
    public static readonly string UpdateUrl = "更新URL";
}
string serverUrl = GlobalConfig.ServerUrl;添加对 System.Configuration 的引用:
1.如果你的项目是 .NET Framework 项目,System.Configuration 通常已经包含在框架中。但在一些情况下,你可能需要手动添加对它的引用。
2.对于 .NET Core 或 .NET 5/6 项目,ConfigurationManager 不再包含在核心框架中。你需要通过NuGet添加 System.Configuration.ConfigurationManager 包。
最后:using System.Configuration;
缺点:会和exe文件一起,输出外部配置文件
/www/wwwroot/demo11.codesdemo.top/template/conch/html/vod/player.html 替换下面的代码
    <div class="btn">
        <a class="cz hl-text-conch" href="{:url('user/buy')}" target="_blank">马上充值</a>
        <a class="gm hl-bg-conch" href="javascript:;" onclick="MAC.User.BuyPopedom(this)" data-id="{$obj.vod_id}" data-sid="{$param.sid}" data-mid="{$maccms.mid}" data-nid="{$param.nid}" data-type="4">确认购买</a>
</div>mysql> alter user 'root'@'localhost' identified with mysql_native_password by 'root';
Query OK, 0 rows affected (0.60 sec)
mysql> flush privileges;
Query OK, 0 rows affected (0.18 sec)